Showing posts with label tutorial. Show all posts

July 10, 2012

pinterest challenge summer edition

Silly me! I totally thought the Pinterest Challenge was tomorrow for some reason! Oh well. I really love what I did this time, unfortunately they look much better at a distance than up close. And they are not up on the wall yet. 

I started with these $3.50 hooks I found in June. 


Thinking of these Anthro stunners.


I cut my tape and got them all prepped and ready.


I painted them with oil based gloss black that I had on hand. And tried to be as careful as possible since the rounded edges left little dimples here and there. 

Here they are! Not perfect at all but at a short distance they look pretty awesome. In fact the hubby came home to see them and I said I painted them myself and he said "yeah right" he thought I bought them!! And then he tried to recover himself a little :)


I love them! I know they will look even better hanging in a row on the wall. I will update after I do so. And with the anthropologie ones coming in at $18 a pop and since I had all the supplies I needed it was a savings of $43.50! Not bad at all!

Make sure you check out the challenge at Young House Love, Bower Power, Centsational Girl, and Ten June!

February 17, 2012

diy pinch pleat curtains

This project was a happy accident for me. It came about because I made my friends curtains last week and I had black rings and a brown rod. Even though I would probably be the only person alive to tell I wanted to hide it a little bit. Since her curtains are not properly hung yet I thought I would show you on a pair of my curtains. Sorry about the night photos :)

In pretty much no time at all I changed my curtains 
          from this................................................................to this

Not too shabby I'd say. Plus, it's another free makeover for me. I love free makeovers! 

You will need ring clips for this. I buy mine at target but any will do.


I started by removing all my clips and measuring out how far I wanted the pinch pleats to be apart. And then messed around with the size of the pleat. Too big. Too small. Just right. This step is purely preference on your part. Mine ended up being just over an inch because that's what I liked best in the end.


There's no real science to it but you do have to have 3 folds. One in front, two in the back. The ring clips are not going to hold much of the length of the back pleats so keep that in mind while making your folds. Then I clamped down at the bottom of my seam in the back of the curtain. Depending on your fabric you may want to iron the pleats. Mine was pretty heavy and worked well.

 All done with this panel


I may end up filling up these holes with some makeshift tubing to give them more structure. I'm going to live with it a little and see. Here's a closeup.


In the end the difference was big to me and kind of small to my husband. But he did notice a difference without me saying "it's the curtains honey" always a plus when I ask him to "come see!"


It gives them much more shape and looks a bit more custom. I'm sure it will tide me over until I get my custom ones sewn. Here they are in the daylight. I need to get my bum to a photography class stat!


Imagine what this could do for a pair of ugly tab top curtains! Just cut off the tabs and add your pleats in the back. I think there are endless possibilities with this one. 


December 2, 2011

advent

On Wednesday, I decided to throw together an advent calendar. We've never had one that involved activities before and I've been wanting one for the past few Christmases. So I buckled down at the last minute and crossed it off my to do list. 

I had hoped to do something like this


But, boxes at Michaels and not cheap and I didn't have time to wait for shipping so I decided to go with plan B. Which is figuring it out while I'm at Michaels. I landed on what I thought was a gift card envelope but it turned out to be a card the size of a gift card. I made it work. Here were my supplies.


I hole punched the corners and ran the ribbon though all 24 cards. This was the most time consuming part but it was nice to sit on the floor and watch TV while I worked on it. 


I played with a few extra embellishments but in the end they took away from the number and I liked the simplicity of it just like this.


{Pay no attention to the crazy reflection and business card I left in the shot} 

If I was to do it again I probably would have done white paper. But I kind of love it just the same. The kids love it too so mission accomplished. We will surely be busy every night with advent activities. And it felt really good crossing it off the to do list. 

Hope you are enjoying all of your festivities.

August 15, 2011

roman joy

I am in love with how the roman shades turned out! It was definitely a labor of love and I put so much into the detail of it that I truly think they will stand the test of time. And they clients are over the moon with them so I couldn't be happier.

Here is the finished project sitting on my carpet all done. Wanna know how I did it?


Supplies:
-Bamboo roman shade
-home decor weight fabric
-fabric liner {not always necessary but was with this fabric}
-scissors
-iron
-spray adhesive
-fabritac
-ribbon

With this tutorial as my guide I dove right in! I started by laying out the roman shade flat and giving it a once over. Cut liner with at least 1 1/2 inches overhang on sides you will not need to cover under the top flap completely because it won't show and the strings cannot be covered. Then I repeated with the fabric.


Note: I should have gone outside or in the garage for this next step probably but I was super careful of my spray and used the other part of the sheet set. I was fine, but if I was you I would do it in a smarter place.

Lay the shade on a drop cloth{or old 1970's sheet} I laid my ironed liner over the shade and got to the adhesive. I started at the top and worked my way down in sections. Spray the fabric and the bamboo shade with the spray adhesive. Making sure to smooth out any wrinkles as I went down. I just used my hands to smooth. Continue until you reach the bottom.

Repeat with fabric on top of liner.


I let them sit for a while after this step. A} because I think it needed it and B} because my kids woke up and I needed to feed them. So later on at nap time... I started ironing the sides over. Pulling tight as I made my way around the shade.

After a minute I got a kitchen towel and moved it along the carpet as I ironed but I didn't take a picture of that. The next step is to glue down all the edges with fabritac. I also glued the top of the fabric that is under the flap for extra strength. And I didn't get a corner picture, man!


Measure out ribbon for the back of the shade and fabritac that down as well over the edges of the fabric. Trimming off access as needed. This gives it more stability and also makes it look fancy from outside.


Looking good from the back.


And here it is. I will work on getting a better picture. It was taken right with the sun shining through so it won't always have the bamboo show. And the string has not been trimmed yet. But you get the jist!  I also left before the matching shade was put up on the other side. I also should say that the shades were a little stiff when we first rolled them up but after about 20 minutes they started to relax and take a better shape in the window.


But we were all super happy with the result! I am also so excited by how this room is coming along. We are getting so close! Pictures of the finished room coming as soon as possible! Still a few weeks out while we wait for furniture to come.
I wish I would have done this for my own house now! If you have any questions feel free to email me at notedhome@gmail.com. What do you think?

July 19, 2011

bulletin beauty

This girly room is all done except for hanging the curtains. Even the rods are up. We are right there people! I will do my best to get pictures and everything I need up before it's time to go out of town this afternoon. In the meantime, I wanted to share a tutorial of how I spruced up some inexpensive bulletin boards yesterday.

I have had this fabric saved for something special for over two years now. So I finally bust it out and got going!


Supplies:
  1. bulletin board-I got mine at Walmart for about $7
  2. ironed{!} fabric
  3. spray adhesive
  4. old credit/gift card
  5. staple gun
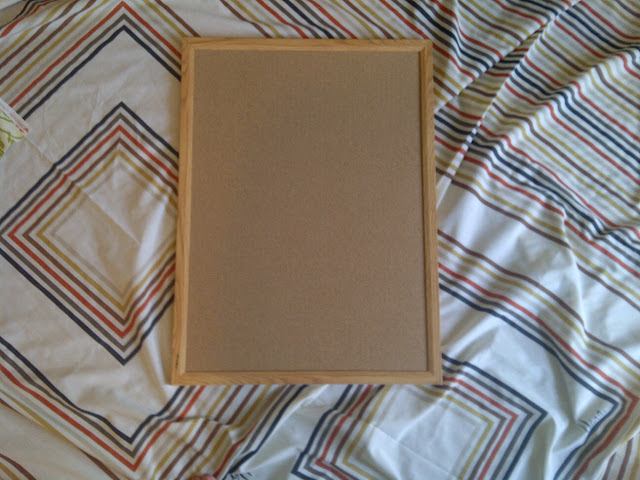
Start with a plain cork board


 Lay your ironed fabric down and cut to fit around cork board. I left a good 1-1 1/2 inches just to wrap all the way around.

Start on the bottom and spray just the cork about 4 inches up the width of the cork. Pull the fabric gently and smooth upward on the cork. Making sure any creases are pulled out and fixed right away. Crease the edges really well. Repeat toward the top until all the cork is covered.

My hand looks fa-reaky!

Next spray one edge at a time. Pull fabric tight as you lay it down. Use that baja card {or whatever you have} to get all the edges, make sure everything is nice and tight.
 
 Then, carefully fold the edges and staple each corner on the back. And spray the back of the molding so the fabric lays down flat.

Blurry...sorry.

This project was SOOOO much easier than all those other bulletins I've done over the last little while. I was able to do two in about 45 minutes start to finish. Not bad. 

I really loved how they turned out!


Next I'm going to hang them with some command adhesive strips and then they will be filled with lots of 6 year old art and memories!

    Related Posts Plugin for WordPress, Blogger...